(DESCRIPTION)
[00:00:00.00] A woman stands at a worktable. Behind her are maps hanging
on a wall, a hooked rack with tools, hats, a backpack, and binoculars. Boots lie
on a table with a lantern and camera. On the table in front of her is a folded
map and a compass on a string. Text, Stephanie, Outdoor Expert and Magnetic
Personality.
(SPEECH)
[00:00:00.11] Hi, I'm Stephanie. And today we're going to learn how to
use a compass and a map. I'll be honest. Compass skills take a lot of practice
to master. But with a few basic concepts under your belt, you'll leave this
video with a great foundation for furthering your knowledge.
[00:00:15.68] If you want to learn more about any of the concepts we
discuss today, L.L.Bean Outdoor Discovery Programs teaches a fantastic map and
compass skills course, which you can sign up for right here.
(DESCRIPTION)
[00:00:28.13] llbeanoutdoors.com.
(SPEECH)
[00:00:28.73] It won't hurt my feelings if you do, I promise. Let's get
started.
[00:00:33.05] [MUSIC PLAYING]
(DESCRIPTION)
[00:00:33.05] Logo, L.L.Bean. Text, How to use a map and compass. A
drawing of an SUV pulling in with canoe tied on top. It heads towards a tent and
fire among pine trees. Clouds, stars, and the moon shine overhead.
[00:00:36.74] Woman walks over a footbridge and on a path in woods. She
wears an orange backpack.
(SPEECH)
[00:00:37.20] So hiking is my happy place. And when I hit the trail,
there are three things I never leave the house without, a recent map of the area
I'm hiking, a good compass, and, of course, a pack of gorp.
(DESCRIPTION)
[00:00:49.66] She drops a plastic container of trail mix onto the table.
(SPEECH)
[00:00:49.91] Because even with all the technology available today, a
map and compass is still the tried-and-true standard for wilderness navigation.
Maps don't have batteries that can run out. And a compass never loses its
signal.
(DESCRIPTION)
[00:01:02.64] Battery icon with power discharging.
(SPEECH)
[00:01:03.24] Without a proper understanding of the tools you'll be
using, you might end up feeling, well, a bit lost. But with a compass, a map,
and a little navigational know-how, you'll almost always find your way.
[00:01:15.39] Before
(DESCRIPTION)
[00:01:15.73] She looks at a compass, stops briefly, then turns to the
right and continues to hike. Text, Section 1. Know Your Compass. Icon of a
compass.
(SPEECH)
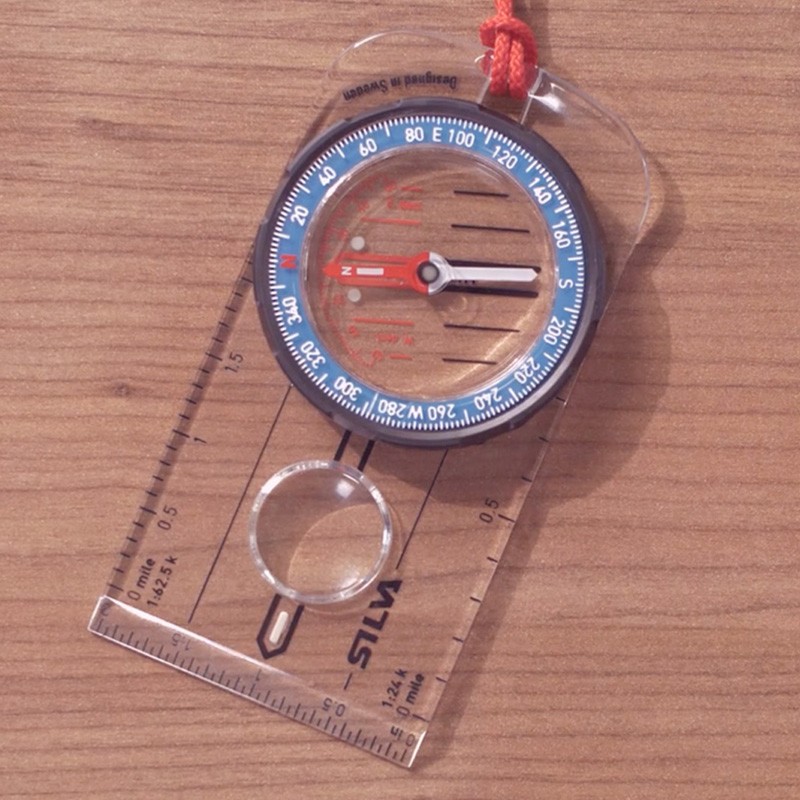
[00:01:15.75] we really get moving, it's important that we learn our way
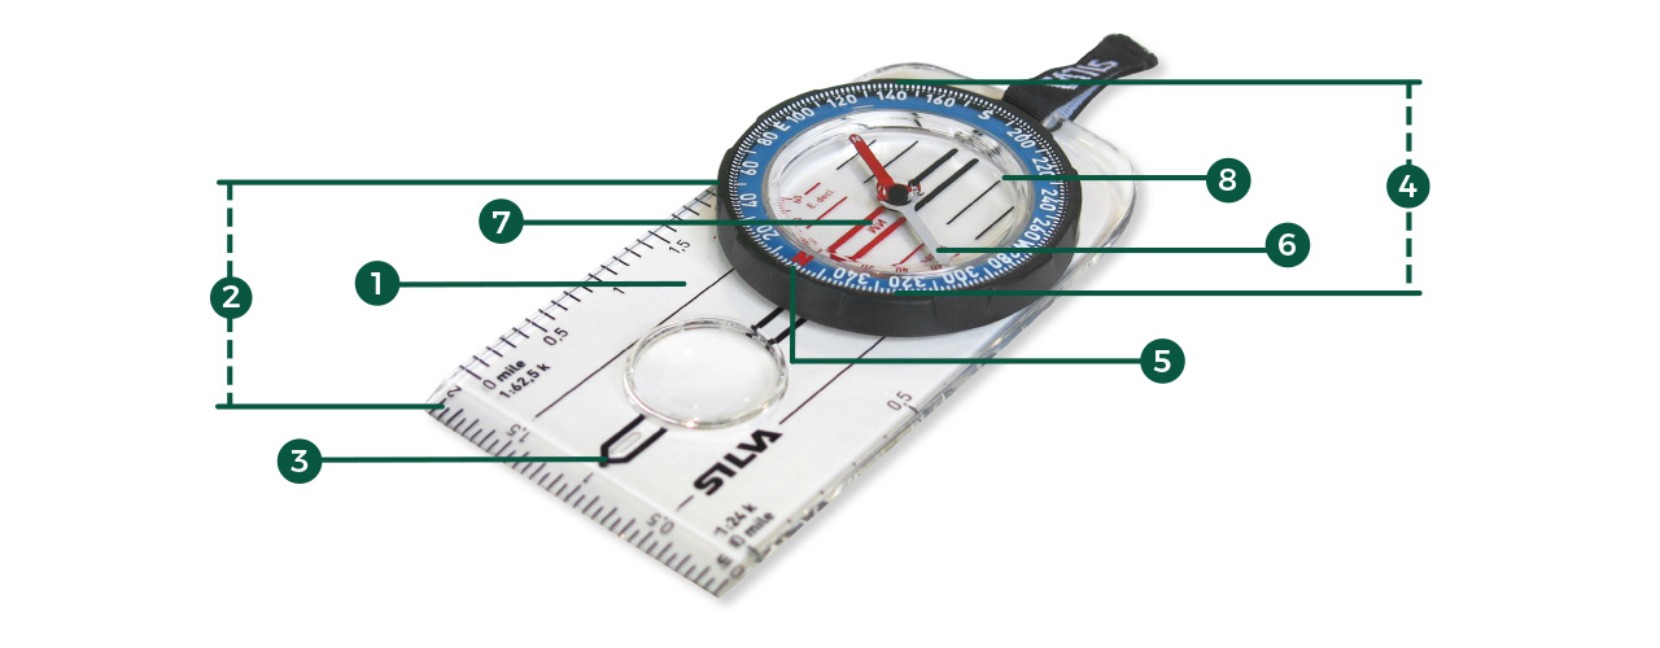
around a compass. This is the baseplate. It's like your compasses command center
with all sorts of handy tools you can use along with a map.
(DESCRIPTION)
[00:01:28.08] A rectangle plastic plate has a 2-inch ruler on one side,
other scales on the left and right, a round magnifying glass on one end, and a
larger compass with red and white spinning needle, and degrees 0 to 360 on the
edge in blue. A graphic word baseplate points to the plastic disk. A string ties
to the end.
(SPEECH)
[00:01:28.26] Every compass has at least one straight edge to help you
take bearings, which we'll talk about in a bit. You can use the ruler to
calculate distances using your map scale.
[00:01:39.75] There's also the direction of travel arrow. The name kind
of says it all.
(DESCRIPTION)
[00:01:43.74] An arrow points from the magnifying circle to the end of
the baseplate.
(SPEECH)
[00:01:44.04] When holding the compass flat in front of you, this
triangle should be pointing the way you want to go.
(DESCRIPTION)
[00:01:49.86] The woman holds the compass flat in her hand with the
arrow pointing away from her.
(SPEECH)
[00:01:50.49] This big circle is a rotating bezel. Some people call it
the dial.
(DESCRIPTION)
[00:01:55.22] She turns the degree disk on the edge of the compass. A
graphic needle spins in the compass center.
(SPEECH)
[00:01:55.74] Notice how it's marked with degrees from 0 to 360. Later
these numbers will help you set your bearing.
[00:02:03.12] And here's the index line. This little guy marks the
bearing you set on the bezel.
(DESCRIPTION)
[00:02:08.56] A line is marked in the plastic above the degree disk. A
red N is marked at another point.
(SPEECH)
[00:02:09.03] Technically, this red arrow is the orienting arrow. But we
like to call it the shed. When the needle is in the shed, you can be confident
you're heading in the right direction.
(DESCRIPTION)
[00:02:19.41] She turns the bezel until a hollow arrow point to the red
N.
(SPEECH)
[00:02:20.04] Over here by the orienting arrow, you'll find orienting
lines. They run parallel to and rotate with the orienting arrow.
(DESCRIPTION)
[00:02:28.16] Lines on either side of the orienting arrow turn as she
turns the bezel.
(SPEECH)
[00:02:28.41] They'll help you line up the compass with true north on a
map. And, finally, this is a needle. It points to magnetic north, not true
north. We'll get into the difference between the two when we talk about
declination.
(DESCRIPTION)
[00:02:41.05] She points to the arrow with red tip at one end and white
tip at the other. Text, Section 2. Navigating Your Map. A graphic of a folded
map with dotted trail lines marked next to topographical wavy lines.
(SPEECH)
[00:02:41.43] OK, now that we know what all those compass bits and
pieces do, let's go over some map features that might come in handy down the
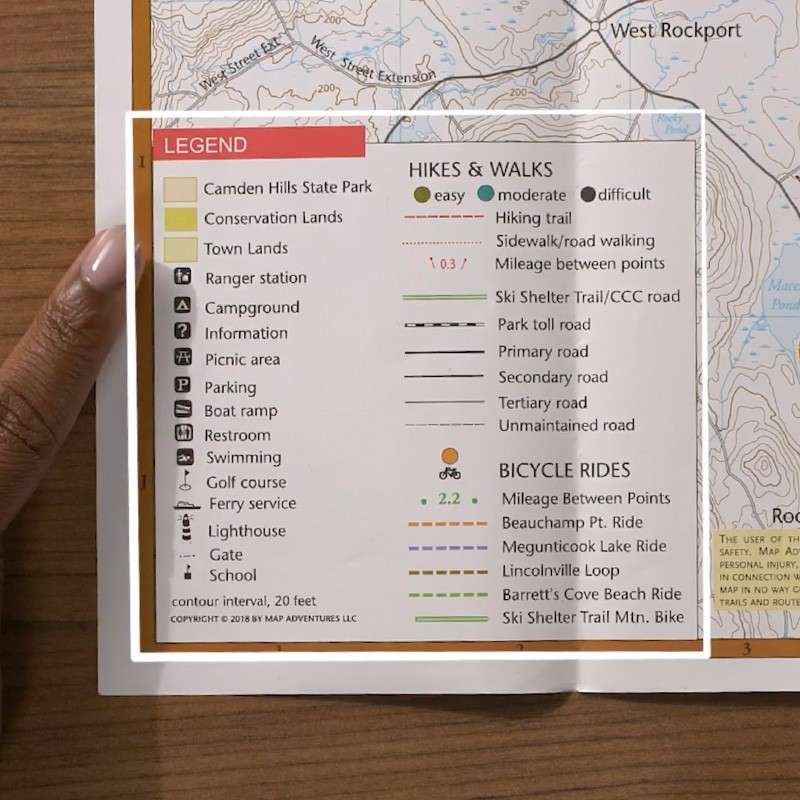
road. Every map is going to be a little different. But all good maps will have a
legend.
(DESCRIPTION)
[00:02:53.51] She opens a map and points to the corner where symbols are
labeled.
(SPEECH)
[00:02:53.85] This topographic map from Map Adventures is particularly
legendary if I do say so myself. The legend will tell you what all the colors
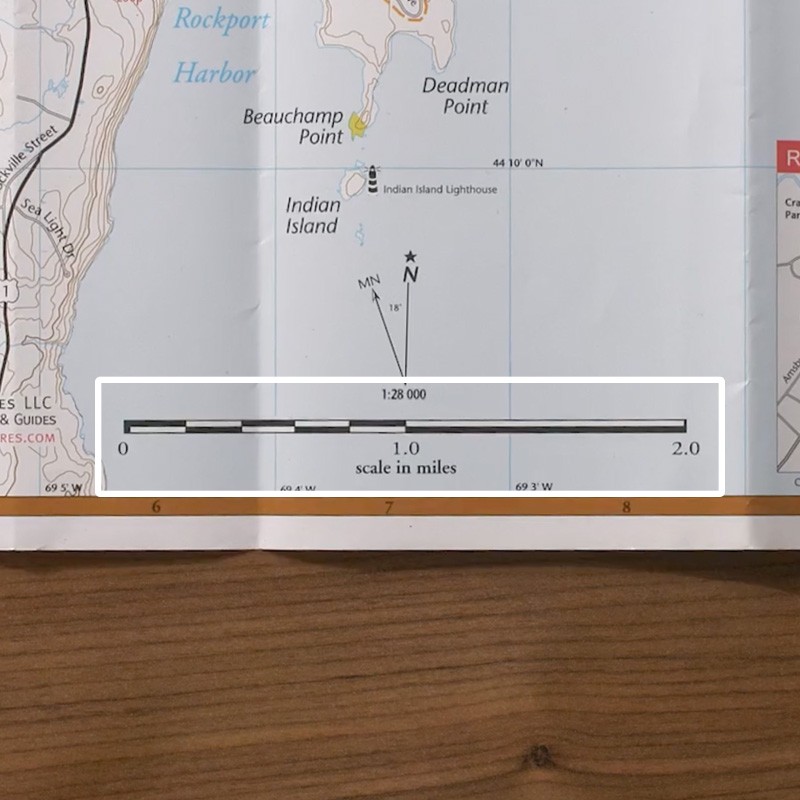
and symbols on the map mean. Right here is a scale. It will help you calculate
distance between two points.
(DESCRIPTION)
[00:03:08.72] Text, Scale in miles. A line with black and white stripes
labels quarter miles and mile lengths.
(SPEECH)
[00:03:09.06] Don't forget your compass has a ruler just for that
purpose.
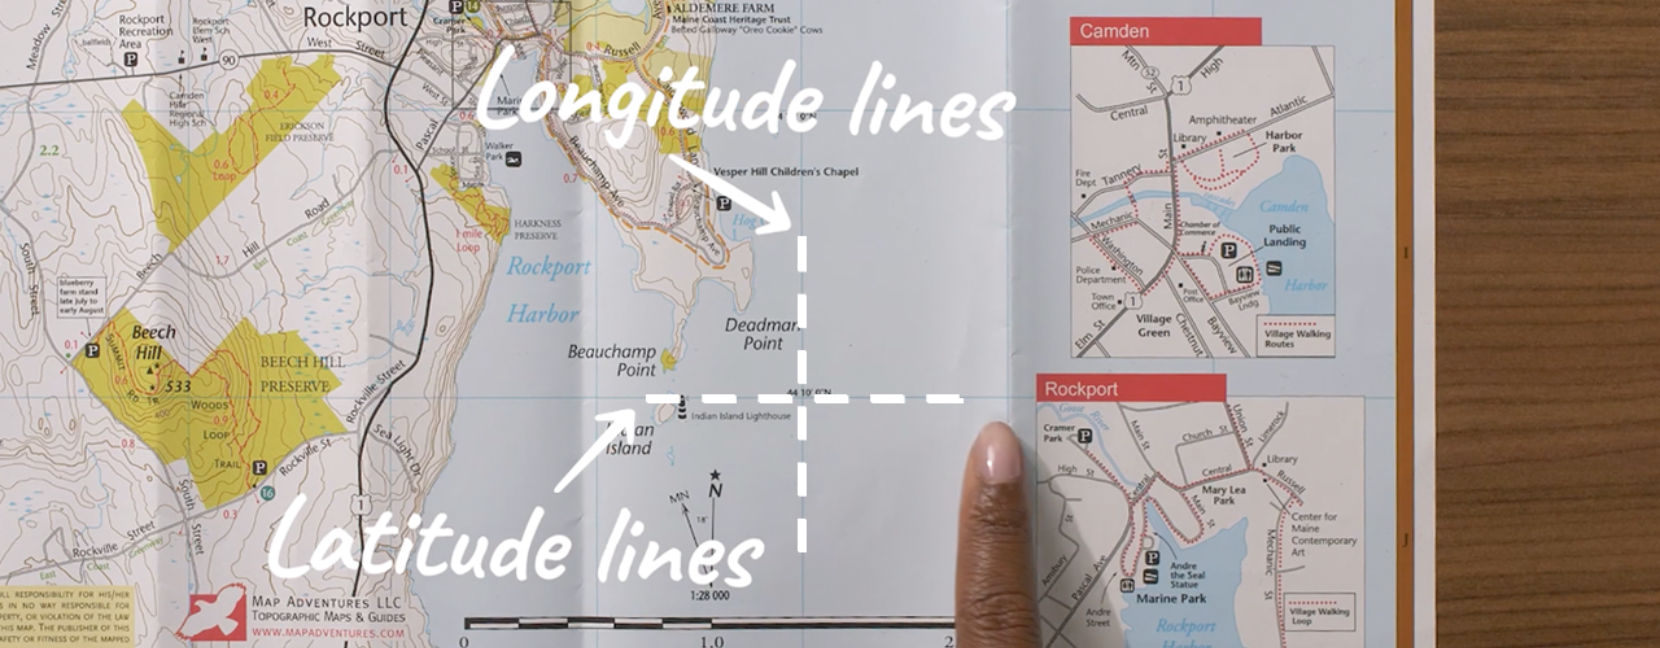
[00:03:12.87] You'll also find latitude and longitude lines.
(DESCRIPTION)
[00:03:16.29] Thin blue lines spaced evenly in rows and columns create a
square grid over the map. Popout detail maps on the edge are labeled Camden and
Rockport.
(SPEECH)
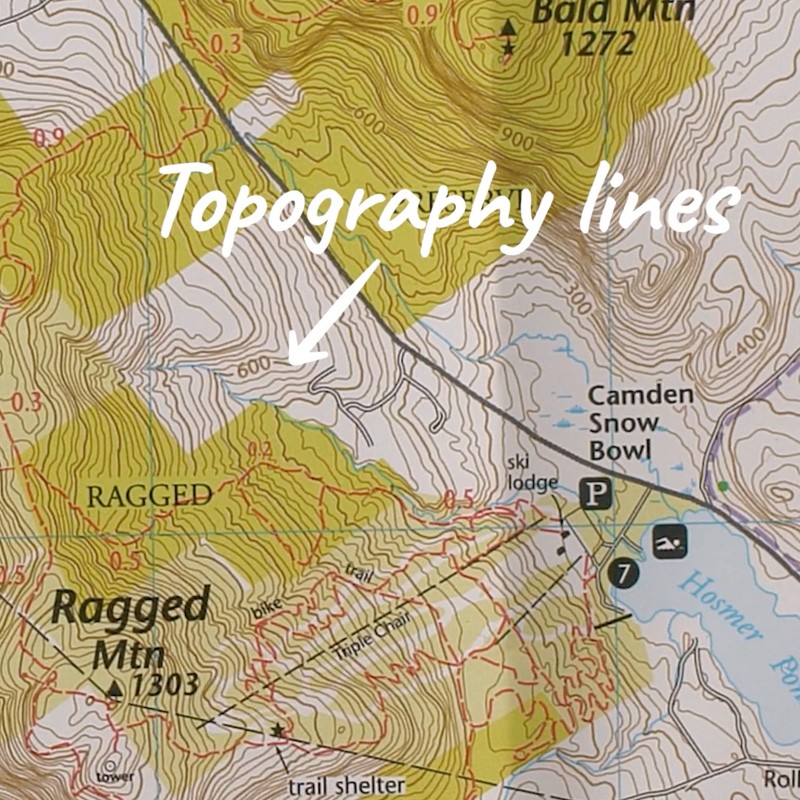
[00:03:16.71] You'll want to line these up with your orienting lines on
your compass. And these are topography lines.
(DESCRIPTION)
[00:03:22.96] Squiggly lines cover the map some are close together,
others widely spaced. Highest elevation areas are irregular circles. Some areas
are colored yellow. A label points to a symbol indicating trail shelter. Ragged
Mountain is featured, with nearby Camden Snow Bowl.
(SPEECH)
[00:03:23.31] The closer they are together, the steeper the elevation
will be. So you'll know exactly what kind of hike you're in for.
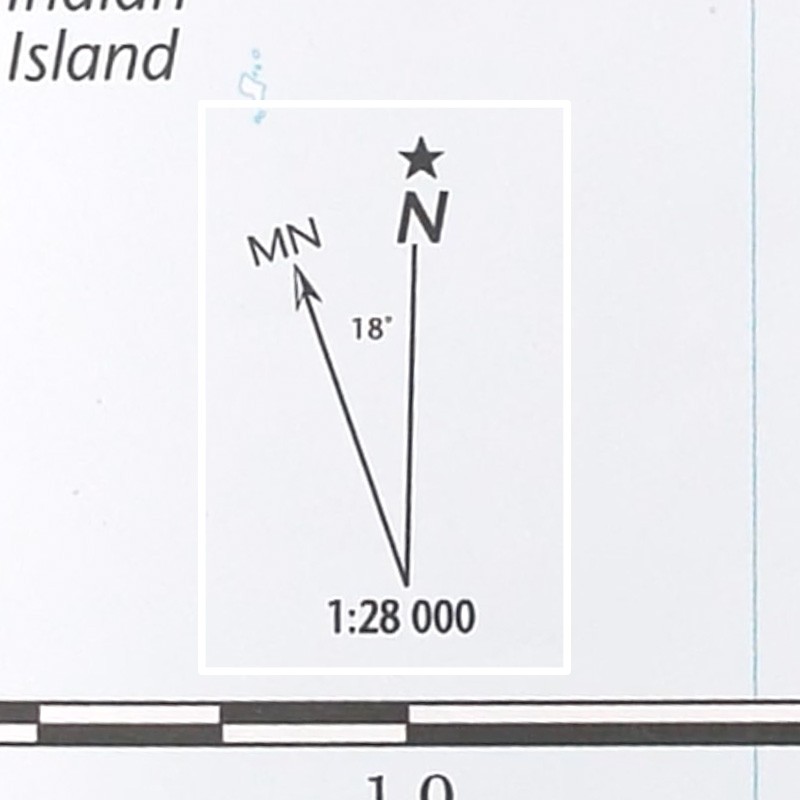
(DESCRIPTION)
[00:03:29.40] Text, Section 3. What is Declination? A graphic shows two
arrows pointing out from a central point at an 18-degree angle. One has MN at
the top, the other a star. Underneath, is 1 colon 28 space zero, zero, zero.
(SPEECH)
[00:03:29.67] Finally, let's take a look at the declination diagram. You
might not know what this is just yet. But there's no time like the present.
Let's get into it. When it comes to maps and compasses, there are a few basic
truths you need to remember.
[00:03:43.29] One, true north is almost always up on your map.
(DESCRIPTION)
[00:03:46.73] The woman points in the air to words that appear. 1. Maps
Use True North. 2. Compasses Use Magnetic North. #. Declination is the angle
difference between the two.
(SPEECH)
[00:03:47.40] Two, magnetic north is where the needle of your compass
points. And three, declination is the angle difference between the two measured
in degrees. You'll need to account for declination to make sure your compass is
guiding you exactly where you want to go.
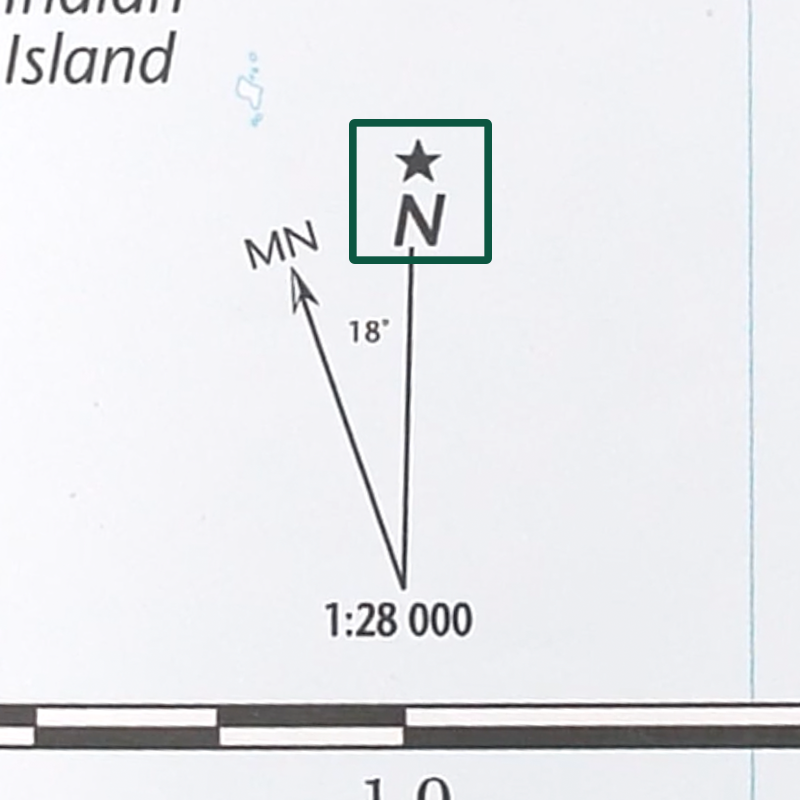
[00:04:03.39] Fortunately, modern map makers have made it easy to find
the direction and degrees of declination right here in the legend. Let's see
what we can learn from this map of Camden Hills State Park, one of Maine's most
spectacular hiking spots. It says here that this region has a declination of 18
degrees west. You're
(DESCRIPTION)
[00:04:22.79] The top of the arrows pointing 18 degrees apart on the map
are circled.
(SPEECH)
[00:04:22.80] going to want to remember that number because we're going
to need it soon. But first we need to learn about one more thing.
[00:04:28.59] You know how people will say they need to get their
bearings? It's a pretty common way to say, I'm feeling a bit lost. Let me take a
second to get myself oriented. That's exactly what we're doing with our compass
and map. A bearing is simply the direction in degrees in which a destination
lies. As long as you know where you are on the map, you can use your compass to
find your way to any other landmark, which leads us to taking a bearing from a
map.
(DESCRIPTION)
[00:04:55.10] Text, Section 4. Taking a bearing from a map. A K A, How
do I get there?
(SPEECH)
[00:04:55.50] A direction like go east works fine on a highway.
(DESCRIPTION)
[00:04:58.52] Graphic of car with canoe tied on top.
(SPEECH)
[00:04:58.77] But it's likely to get you lost in the wilderness. Out
here we want to follow a bearing of x degrees to give us the most accurate path
to our destination.
(DESCRIPTION)
[00:05:07.86] Graphic of person walking with a map and 12 degrees
displayed above them.
(SPEECH)
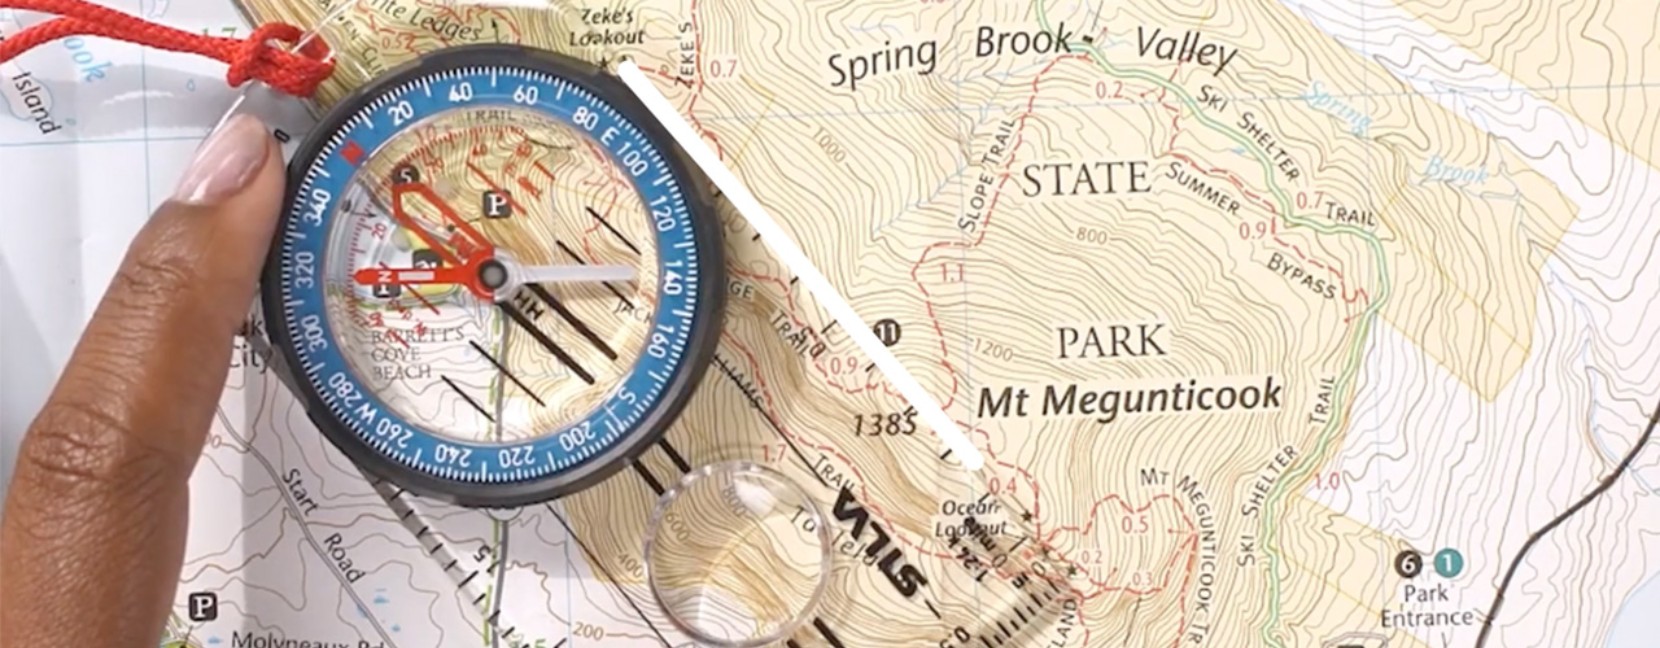
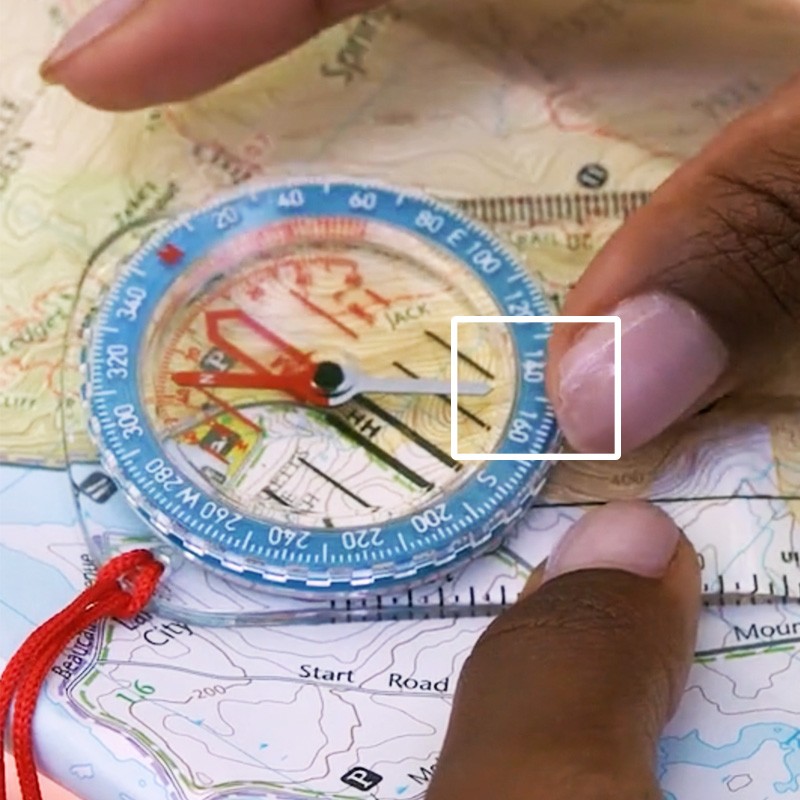
[00:05:08.22] Let's say today I want to hike from Zeke's Lookout here to
the summit of Mount Megunticook here. First we'll place the compass on the map
with a straight edge along our planned line of travel.
(DESCRIPTION)
[00:05:21.32] The woman points to one mountain, then the other on the
map. She lays the straight edge of the compass between the two points.
(SPEECH)
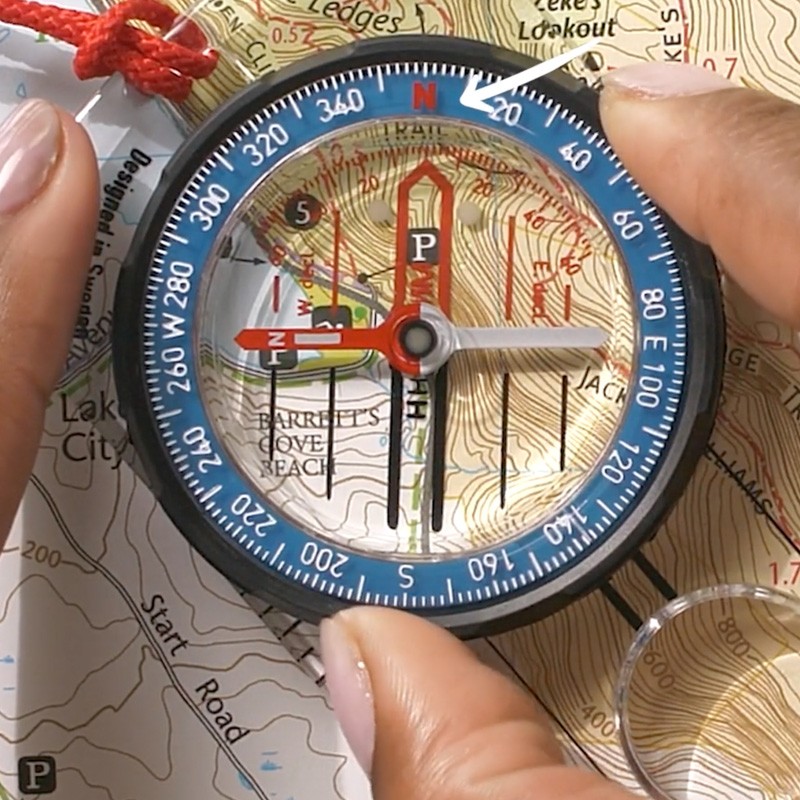
[00:05:21.95] Rotate the bezel until the end points to north on the map.
(DESCRIPTION)
[00:05:25.75] She rotates the bezel until the hollow arrow points up.
The lines parallel to the arrow line up with the longitude lines.
(SPEECH)
[00:05:26.15] We'll know we hit the sweet spot when the orienting lines
on the compass are parallel with the grid lines of the map. You can also use the
edge of the map if you don't see any lines.
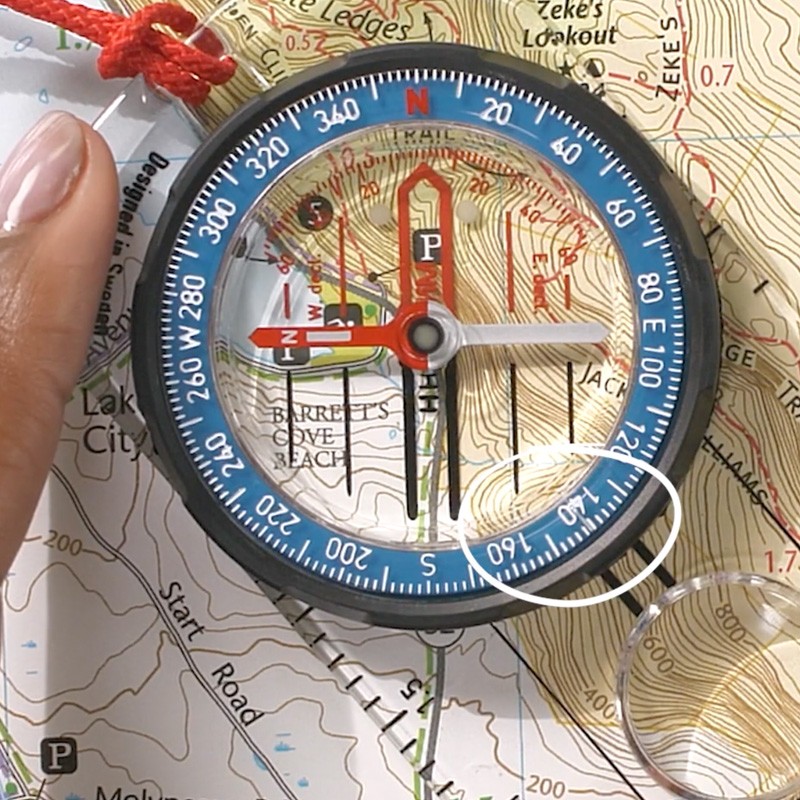
[00:05:36.44] The number that's now lined up with your index line is 141
degrees. That's your true bearing.
(DESCRIPTION)
[00:05:41.78] A circle appears over the 141 degree mark that aligns with
the index line printed on the edge of the compass.
(SPEECH)
[00:05:42.08] Because remember, when we're on the map we're always using
true north as the context for our bearing.
[00:05:47.81] So this is where it gets a bit tricky. When it's time to
start using your compass in the field, you need to convert that bearing to a
unit your compass understands, magnetic. And we do that using-- have you guessed
it-- declination.
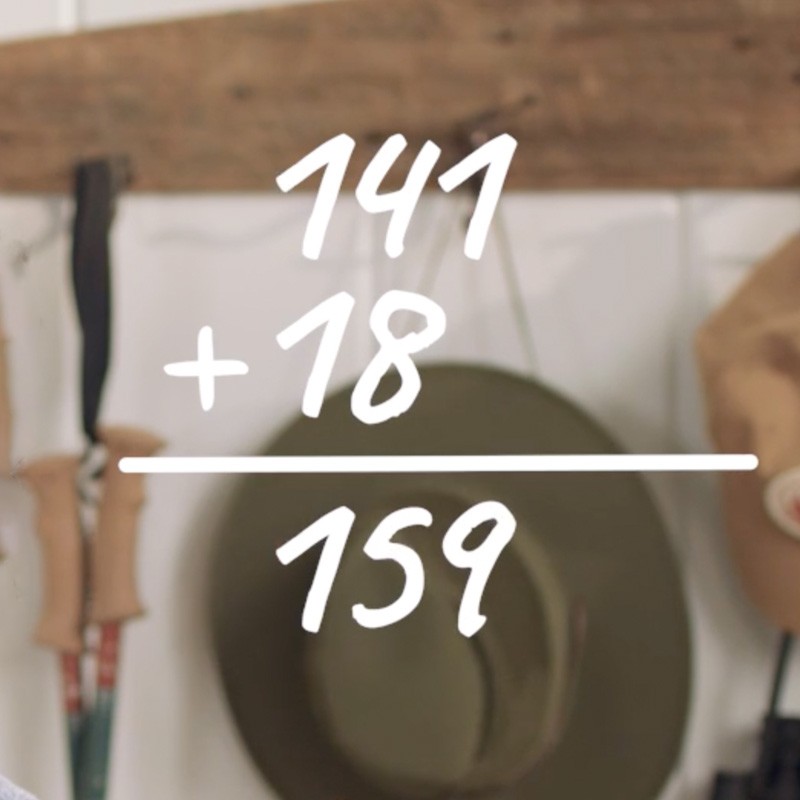
[00:06:01.34] Our map told us that the declination of this area is 18
degrees west. So we're going to add 18 to the true bearing we took on the map. A
little quick math.
(DESCRIPTION)
[00:06:11.36] A graphic equation appears over her head.
(SPEECH)
[00:06:11.78] 141 plus 18 gives us 159. If we were working with an east
declination, we would want to subtract 18 instead. But we'll save that for a
different hike. An easy way to remember whether to add or subtract is west is
best. East is least.
(DESCRIPTION)
[00:06:30.41] Text, Section 5. Using your compass in the field.
(SPEECH)
[00:06:31.47] OK, so we've calculated our magnetic bearing. And we're
ready to take this show on the road.
(DESCRIPTION)
[00:06:36.00] A split screen shows the woman in the woods waving and the
in-room woman seems to wave back.
(SPEECH)
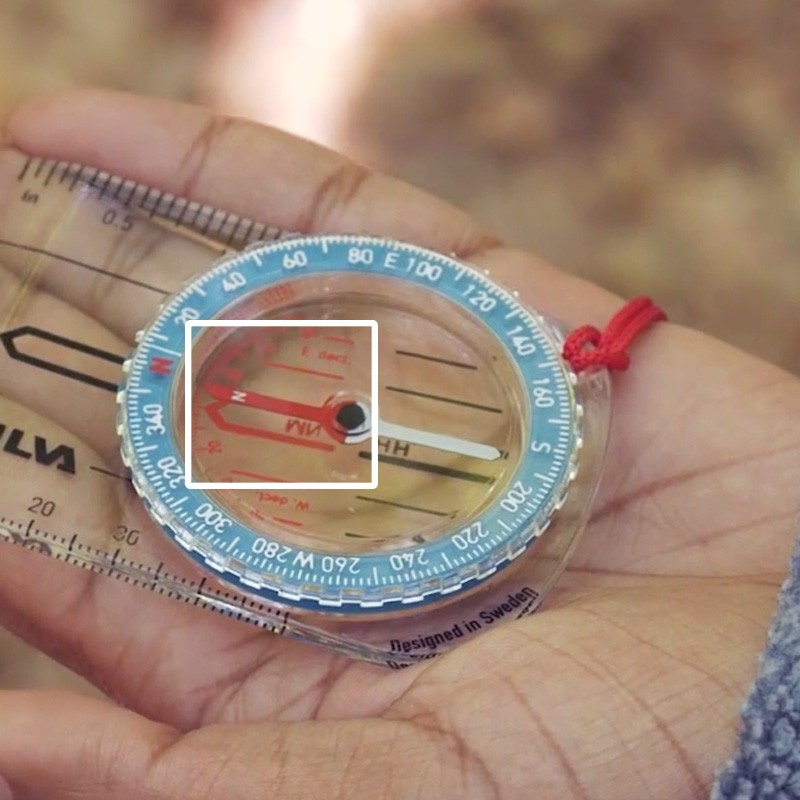
[00:06:36.93] Oh, I love your fleece. First turn the bezel on your
compass until our bearing of 159 degrees lines up with the index. Now hold the
compass flat in front of you.
(DESCRIPTION)
[00:06:50.17] She holds it flat in both screens. The arrows align
together as she turns.
(SPEECH)
[00:06:50.71] Turn your entire body along with the compass until the
needle rests inside the orienting arrow or the shed. This is what we like to
call putting Red Fred in the shed.
(DESCRIPTION)
[00:07:02.96] Text appears Red Fred in red, then In the Shed in white.
(SPEECH)
[00:07:03.36] Now that Red Fred is comfortably in his shed, you'll want
to leave him alone. Turn your attention to the direction of travel arrow, which
will now be pointing to your destination. Look up. Select a landmark in that
direction. And get moving.
[00:07:18.78] Don't forget. Keep those eyes up. If you're always staring
down at your compass, you won't be aware of any obstacles in your path or a
bear. Whoa, that was crazy.
(DESCRIPTION)
[00:07:30.08] Woman in woods looks around then looks up and walks
forward. Woman in room frowns.
(SPEECH)
[00:07:30.69] If Red Fred ever leaves his shed, stop immediately. And
turn your body along with the compass until he's back home. Keep following that
direction of travel arrow until you've reached your destination.
[00:07:44.10] One thing to keep in mind, metal objects can interfere
with the magnetic field of your compass needle, leaving you wondering which end
is up.
(DESCRIPTION)
[00:07:51.99] Graphic of compass with spinning needle.
(SPEECH)
[00:07:52.56] So be sure to keep your compass away from items like
watches, keys, tables with metal legs, your friend's compass, and even a cell
phone.
(DESCRIPTION)
[00:08:01.56] Graphic drawings of named items.
(SPEECH)
[00:08:02.10] So even if you do have service out here, I'd ignore that
call for now.
(DESCRIPTION)
[00:08:06.22] Woman in woods holds phone to her head, smiles, then
returns the phone to her pocket and frowns. Woman in room smiles and shakes her
head from side to side.
(SPEECH)
[00:08:08.25] It's amazing what you can accomplish with just a map and a
compass. Now I just have to find my way back to camp. I know that using a map
and compass can be a little intimidating at first. But I promise it gets easier
with practice.
[00:08:23.28] To help you on your journey, you'll find a downloadable
guide below outlining all the compass skills we just learned together. Print it
out. And take it with you on your next trek.
[00:08:33.87] And if you want to learn even more or practice in the
field with experts who really know their way around a map and compass, consider
attending a map and compass skills course with L.L.Bean Outdoor Discovery
Programs. You can search for classes and sign up at llbeanoutdoors.com.
[00:08:50.94] I hope we find each other on the trail sometime soon. In
the meantime, like and subscribe to make sure you don't miss out on our next
how-to video.
(DESCRIPTION)
[00:08:58.86] The website appears with a thumbs-up logo.
(SPEECH)
[00:08:58.92] And visit llbean.com/outside for more outdoor tips and
inspiration. Now if you'll excuse me, other Stephanie needs my help.
[00:09:09.16] [MUSIC PLAYING]
(DESCRIPTION)
[00:09:15.69] The woman picks up her map, compass, holds them in front
of her, frowns, then walks off-screen.